
Lime Drizzle Mango & Cardamom Cake (egg and gluten-free)
Serves: 10 - 12 slices
Prep: 15 minutes. Bake: 30 minutes
Suitable for: Vegetarians and those on an egg and gluten-free diet.
A delicious gluten free cake using Indian mangoes in season

Lime Drizzle Mango & Cardamom Cake
Ingredients:
‘Dry Ingredients’
150g gluten-free self raising flour, sifted
40g buckwheat flour, sifted (can use gluten-free self raising flour as an option)
1 teaspoon of finely crushed cardamoms
1 teaspoon gluten-free baking powder, sifted
½ teaspoon bicarbonate of soda, sifted
‘Wet Ingredients’
250g mango pulp (I used a tinned version)
397g (small tin) sweetened condensed milk
40g unsalted butter/ghee, melted
Oil for greasing a loaf tin
Lime Drizzle:
100g icing sugar, sifted
6 teaspoons of lime juice, more or less depending on consistency of the drizzle.
Method:
Preheat the oven to 180°C/350°F/Gas Mark 6
Grease a 1lb/450g loaf tin, no need to line.
Melt the butter/ghee on a low heat and allow to cool.
Place all the ‘dry ingredients’ in a bowl and mix the contents to blend.
Pour the mango pulp and condensed milk in a large bowl. Add the butter/ghee once cooled and whisk these three ingredients thoroughly until fully incorporated and aerated.
Add the dry ingredients and mix them in gently with a metal spoon then whisk to combine all the ingredients together.
Pour this cake mixture into the greased loaf tin and ensure mixture is evenly spread using a spatula
Bake in the over for 30 - 40 minutes until browned and baked through (check by passing a skewer through the centre of the loaf and it will come out clean if baked).
Remove from the oven. As soon as the loaf tin is cool enough to handle remove the cake from the tin and cool on a wire rack.
In the meantime, make the lime drizzle by combining lime juice with icing sugar until fully blended, smooth and of a pouring consistency.
Once the cake is cool, drizzle the lime drizzle over the top, allow drizzle to set.
Slice and serve.
As it’s a moist cake it can be kept at room temperature for a couple of days and up to five days in the fridge. It freezes well too in an airtight container lined with parchment paper.
Ground Elder Paranthas
Makes: 6 Paranthas
Preparation time: 20 minutes. Dough resting time: 10 minutes
Rolling out/cooking time: approx. 25 minutes
Suitable for: Vegetarians, Vegans (use a vegetable oil to brush each side of parantha) and those on a gluten free diet
Make use of those young ground elder leaves growing in the garden before they start to flower. Similar in taste to methi parathas, ground elder is a herb that is considered to be beneficial for for those with inflammatory disease, such as gout, but please seek medical advice for your own particular condition.
Serve piping hot with any curry, yoghurt and pickle or chutney.

Gluten-free ground elder paranthas
Ingredients:
For the filling:
1 tablespoon oil
1 teaspoon of cumin seeds
3 spring onions, the white part and the tender green stem, finely chopped
50g young ground elder leaves, washed and chopped
1 clove garlic, crushed or finely grated
½ green chilli, finely chopped
¾ teaspoon salt
¼ teaspoon turmeric
¼ teaspoon garam masala
For the dough:
200g gluten-free chapati flour (I use Eurostar Food Gluten Free flour) or ordinary chapati flour if not on a gluten-free diet.
1 tablespoon of plant based milk (dairy for non-vegans)
70 - 80ml water
Extra gluten free chapati flour for dusting and rolling out
Oil to brush each side of the parantha (ghee can be used by non-vegans)
Method:
Make the filling:
Heat the oil in a frying pan. Add the cumin and allow it to sizzle.
Add the chopped spring onions and fry on medium heat until soft, about five minutes
Add the crushed garlic and chilli, stir and cook for a minute or so.
Add the salt, turmeric and garam masala, stir to incorporate into the fried onions. Cook for a further minute or so.
Add the chopped ground elder leaves, stir and cook on medium heat until wilted and cooked, about 5 minutes.
Take off the heat and set aside to cool.
Making the parantha dough and paranthas:
Place the flour in a bowl, add the milk and combine.
Add the ground elder filling, mix the contents together until a crumb like consistency forms
Pour in the water a small amount at a time, mix/knead to form a pliable dough.
Knead for a few minutes until the dough feels smooth, dipping your fingers in the water to add additional water if needed.
Cover the bowl with cling film and allow the dough to rest for 10 minutes or so.
Place the tawa or frying pan on the hob and heat on a medium to hot setting
Knead the dough once again for a couple of minutes then divide into six portions. If the dough feels too soft at this stage, roll it in thin dusting of dry chapati flour.
Starting with one portion, knead this again using your hands to form a ball and then flatten slightly with your fingertips.
Dust each side and roll out into a circular parantha approximately 6 inches in diameter using additional flour to dust where needed
Place the parantha on the hot tawa and allow it to cook partially on one side for a couple of minutes. Turn the parantha over and allow this (raw) side to cook for a few minutes checking a couple of times and pressing lightly around the edges if needed to ensure this side is fully cooked.
Turn the parantha back over once this side is fully cooked and coat the cooked side of the parantha with some ghee (c. ¼ teaspoon). Turn the parantha over once again and repeat the ghee coating process on this other side. Turn over once more and gently cook for a further 30 seconds or so. The parantha should be crisp on both sides yet soft in the middle
Remove from the tawa and place the parantha in a clean tea towel folded over on a warm plate.
Repeat steps 8 to 12 until all paranthas have been made.
Serve hot
Badam (Almond) Barfi
Makes: 20 pieces
Suitable for: Vegetarians, Vegans and those on a gluten free diet
Preparation time: 5 minutes
Making barfi time: 25 minutes
Total time: 30 minutes
A popular barfi for any occasion in particular Diwali, the Festival of Lights. It’s quick and easy to make too.

Badam Barfi
Ingredients:
200g ground almonds
125g granulated white sugar
90ml water
½ teaspoon of crushed cardamoms or 1 teaspoon of rose water, optional
few strands of saffron, optional
a few sliced pistachios for garnishing
Method:
Dissolve the sugar in the water on medium heat stirring occasionally. Add the crushed cardamoms.
Turn the heat down to just simmering point and simmer gently for 5 minutes.
Add the ground almonds and stirring gently to ensure they combine without forming lumps.
Continue to stir over a low/medium heat for a further 5 minutes or so until mixture starts to leave the sides of the pan turning down the heat further if it starts sticking.
Test the mixture to see if it is ready by taking out a small amount with a teaspoon. Allow it to cool and then roll between your fingers. If it forms a smooth round ball cleanly without sticking to your fingers, the mixture is ready.
Remove from the heat and transfer to a shallow bowl or plate and allow to cool.
Once cool enough to handle, knead the almond mixture for a few minutes to make the almonds less grainy, smooth and slightly glossy.
Sprinkle a few strands of saffron over the mixture and knead gently in the palm of one hand with the fingers of the other for a minute or so.
Roll out the mixture between two sheets of greaseproof paper into a rectangular shape about 1cm thick.
Allow the barfi to cool down completely and then cut the barfi into diamond shapes with a sharp knife.
Serve the barfi as an after meal treat or with a cup of tea time chai.
This barfi can be stored in an airtight container for up to 5 days depending on the ambient temperature.
Dal Paranthas (Toor Dal, Red Lentil & Courgette Dal)
Makes: 6 Paranthas
Preparation time: 10 minutes. Dough resting time: 10 minutes
Rolling out/cooking time: approx. 25 minutes
Total time (including resting): 45 minutes.
Suitable for: Vegetarians, Vegans (use a vegetable oil to brush each side of parantha) and those on a gluten free diet.
Serve piping hot.

Red Lentil & Courgette Dal Paranthas
Ingredients:
200g chapati flour or gluten free chapati flour (I use Eurostar Food Gluten Free flour)
150g left over dal (I used left over toor dal)
½ teaspoon salt
¼ teaspoon chilli powder
¼ garam masala
70 - 80ml water, if needed
Extra gluten free chapati flour for dusting and rolling out
Oil to brush each side of the parantha (ghee can be used by non-vegans)
Method:
Place the flour in a bowl, add the salt, chilli powder and garam masala. Mix together.
Add the dal and combine until a large bread like consistency forms
Pour in the water a small amount at a time, mix/knead to form a pliable dough.
Knead for a few minutes until the dough feels smooth, dipping your fingers in the water to add additional water if needed.
Cover the bowl with cling film and allow the dough to rest for 10 minutes or so.
Place the tawa or frying pan on the hob and heat on a medium to hot setting
Knead the dough once again for a couple of minutes then divide into six portions. If the dough feels too soft at this stage, roll it in thin dusting of dry chapati flour.
Starting with one portion, knead this again using your hands to form a ball and then flatten slightly with your fingertips.
Dust each side and roll out into a circular parantha approximately 6 inches in diameter using additional flour to dust where needed
Place the parantha on the hot tawa and allow it to cook partially on one side for a couple of minutes. Turn the parantha over and allow this (raw) side to cook for a few minutes checking a couple of times and pressing lightly around the edges if needed to ensure this side is fully cooked.
Turn the parantha back over once this side is fully cooked and coat the cooked side of the parantha with some ghee (c. ¼ teaspoon). Turn the parantha over once again and repeat the ghee coating process on this other side. Turn over once more and gently cook for a further 30 seconds or so. The parantha should be crisp on both sides yet soft in the middle
Remove from the tawa and place the parantha in a clean tea towel folded over on a warm plate.
Repeat steps 8 to 12 until all paranthas have been made.
Serve hot
Besan Barfi
Makes: 20 - 24 pieces
Suitable for: Vegetarians and those on a gluten free diet
Preparation time: 5 minutes Roasting Besan: 30 minutes Sugar Syrup: 10 minutes
Total time: 45 - 50 minutes

Besan Barfi
Ingredients:
300g besan (gram/chickpea flour), sifted
180g ghee
180g granulated white sugar
150ml water
1 teaspoon of crushed cardamoms
20g pistachios, sliced
19cm diameter tin (sandwich cake tin), greased with a little ghee
Method:
Cooking the Besan:
Melt the ghee in a large flat bottomed pan on low heat.
Add the besan about a third at a time and mix with the ghee until both have combined thoroughly between each addition.
Continue to cook on low heat stirring continuously. At this stage the mixture will look slightly granular and thick but as the besan cooks in the ghee the mixture will become softer, molten and start leaving the sides of the pan becoming one big mass. It will become more molten as the cooking process continues.
After about 25 - 30 minutes the mixture will turn golden brown in colour and a nutty aroma will exude signalling the besan has been thoroughly cooked/
Stir in the crushed cardamoms and most of the sliced pistachios, keeping some aside to sprinkle on top.
Take off the heat and allow to cool.
Making the Syrup:
Combine the water and sugar in a pan. Stir and allow to dissolve on low to medium heat.
Once melted, bring to a simmer.
Simmer gently on low to medium heat, stirring occasionally until a syrup of 1 - 2 thread consistency forms (about 10 minutes).
To test consistency, place a drop of the syrup onto a plate and allow it to cool for 15 - 30 seconds. Scoop the drop with your fore finger and, using your thumb gently pull it about half to once centimetre away from the finger, a thread should form in-between. This is known as ‘thread consistency’. The mixture should form one and half to two thin ‘threads’
Take off the heat and allow to cool for about 5 minutes.
Putting it all together:
Being careful, gently pour the sugar syrup into the besan mixture and mix it in quickly and vigorously until the combined mixture starts leaving the sides of the pan (the besan mixture will begin to harden fairly quickly). This will take a few minutes.
Tip: This process should be carried out away from you towards the back of the stove to avoid splashes of hot syrup.
Place the mixture in the greased tin and flatten evenly with a spatula.
Sprinkle the sliced pistachios over the top and gently press into the mixture with a spatula.
Whilst still warm, cut the barfi into squares/diamond shapes.
Cool and enjoy.
Store in an air-tight container for up to week at room temperature.
Serve as a dessert or snack with a hot cup of chai.
Stuffed Bullet Chillies
Makes 12
Prep: 10 minutes Cooking: 15 minutes. Baking: 35 - 40 minutes
Total: 65 minutes
Vegetarian, vegan and those on a gluten-free diet
Serve as an accompaniment.

Ingredients:
12 bullet chillies, washed and dried with a kitchen towel.
Masala Filling:
2 tablespoons vegetable oil
1 teaspoon cumin
1 medium onion, coarsely grated or chopped very finely
3 tablespoons chopped tomatoes, tinned or fresh
1 clove garlic, crushed
½ green chilli, deseeded and chopped
1¼ teaspoons salt
½ teaspoon turmeric
¼ teaspoon garam masala
handful of chopped coriander leaves
extra oil for brushing chillies
Method:
Make the masala filling. Heat the oil (butter or ghee) on medium heat until fairly hot (be careful with butter/ghee as these have lower smoking points). Add the cumin seeds and cloves and stir until they splutter (virtually immediately)
Turn the heat down to low/medium, add the onions and fry gently stirring occasionally until they soften.
Add the tomatoes, salt, turmeric, chillies, garlic, ginger stir. Continue to cook gently, ‘mashing’ the tomatoes until a paste like consistency forms. I use a potato masher.
Add the garam masala, stir and cook for a further minute or so or until oil oozes out of the paste when a wooden spoon is dragged along the base of the pan Stir in the chopped coriander once the filling has been made, stir for a minute or so. Cool
Preheat the oven to 180°C/350°F/Gas Mark 6Wash and wipe dry the chillies with a clean tea towel
Leaving the stalk on, make a slit lengthways along each chilli
Using a ‘pointed’ teaspoon, remove all the seeds inside the bullet chillies and set aside.
Once the filling has cooled down, place half to one teaspoon of filling into each bullet chilli. Do not overfill.
Brush rapeseed oil liberally over each chilli to coat and place on a foil lined baking tray. Once all have been coated with oil, place the tray in the oven for 35 - 40 minutes, turning the chillies over a couple of times.
The chillis are ready when they are cooked through; the skin should be wrinkly and ‘charred’ in appearance.
Gently pull off the stalks removing any residual seeds with it before serving with any meal. Enjoy.
Arbi (taro root) Masala
Serves 4 as a side dish
Prep: 20 minutes
Roasting: 35-40 minutes Total: 65 minutes
Vegetarian, vegan and those on a gluten-free diet
Serve as a side dish with one of the dals.
Traditionally the chipped arbi and potatoes are deep fried before adding to the ‘masala’. In this recipe I have roasted them for a healthier option for those on a low fat diet.

Arbi Masal
Ingredients:
600g Arbi (taro root) or eddoes (about 8 individual arbis)
450g small waxy potatoes
3 tablespoons vegetable oil
Masala:
3 tablespoons vegetable oil
2 teaspoons cumin
1 medium onion, coarsely grated or chopped very finely using a food processor
3 tablespoons chopped tomatoes, tinned or fresh
1½ green chillies, chopped
2 cloves garlic, crushed
1¾ teaspoons salt
½ teaspoon turmeric
¼ teaspoon garam masala
handful of chopped coriander leaves
lime juice, optional
Method:
Preheat the oven to 180 - 200°C/400°F/Gas Mark 6
Peel the arbi, wash, dry each one with a clean tea towel and slice lengthways as you would for chunky chips.
Peel the potatoes, slice lengthways, was and dry lightly in a clean tea towel
Place the prepared arbi and potatoes in large bowl. Add 3 tablespoons of oil and mix gently but thoroughly to coat the vegetables
Place on a baking tray and into the oven for approximately 35 - 40 minutes turning the arbi and potatoes over half way through roasting
Meanwhile make the masala. Heat the oil on medium heat until fairly hot (be careful with butter/ghee as these have lower smoking points). Add the cumin seeds and cloves and stir until they splutter (virtually immediately)
Turn the heat down to low/medium, add the onions and fry gently stirring occasionally until they soften.
Add the tomatoes, salt, turmeric, chillies, garlic, ginger stir. Continue to cook gently, ‘mashing’ the tomatoes until a paste like consistency forms. I use a potato masher.
Add the garam masala, stir and cook for a further minute or so or until oil oozes out of the paste when a wooden spoon is dragged along the base of the pan
Add the roasted arbi and potatoes to the masala, stir to combine with the masala.
With the lid on the pan, cook on low/medium heat for a couple of minutes.
Stir and add the chopped coriander.
Stir to combine then cook, the lid on for a further two minutes.
Remove from heat and serve with a squeeze of lime juice (optional), a dal dish, paranthas/roti and yoghurt.
Stuffed Karela (Bitter Gourd)
Makes 8 small stuffed Karelas
Prep: 10 minutes Stuffing: 20 minutes. Frying: 20 minutes
Total: 40 - 50 minutes.
Vegetarian, vegan and those on a gluten-free diet
Serve as a side dish with one of the dals

Stuffed Karelas (Bitter Gourds)

Raw Karelas ready for shallow frying
Ingredients:
8 small bitter gourds
2 - 3 teaspoons salt
white cotton thread/kitchen twine
oil for shallow frying or bake in the oven liberally coated with a vegetable oil
Filling:
3 tablespoons vegetable oil
1½ teaspoons cumin
2 medium onions, coarsely grated or chopped very finely
4 tablespoons chopped tomatoes, tinned or fresh
1½ teaspoons salt
¾ teaspoon turmeric
¼ teaspoon garam masala
1 - 2 garlic cloves, crushes or grated finely
handful of chopped coriander leaves
Method:
Top and tail the bitter gourds, then scrape off the knobbly bits
Slit open the bitter gourds lengthways and remove any of the hard seeds, the soft ones can remain.
Rub some salt on the outside and inside of the bitter gourds and set aside for 15 minutes
Meanwhile make the filling. Heat the oil (butter or ghee) on medium heat until fairly hot (be careful with butter/ghee as these have lower smoking points). Add the cumin seeds and stir until they splutter (virtually immediately)
Turn the heat down to low/medium, add the onions and fry gently stirring occasionally until they soften.
Add the tomatoes, salt, turmeric, chillies, garlic and stir. Continue to cook gently, ‘mashing’ the tomatoes until a loose paste like consistency forms. I use a potato masher.
Add the garam masala, stir and cook for a further minute or so or until you can see the oil oozing out of the paste. Add the chopped coriander and stir through for a minute or two.
Rinse the bitter gourds thoroughly under running water both on the outside and inside, removing any seeds that have come loose gently.
Drain the bitter gourds and squeeze with your hands to remove any excess water finishing off with a squeeze using kitchen paper and set aside.
Cut the cotton thread/twine into 8 sections approximately 2 meters in length and set aside.
Using a teaspoon stuff each bitter gourd with the masala, three to four teaspoons should suffice depending on the size of the bitter gourd.
Taking one length of the cotton thread/twine wind this tightly around the length of the stuffed bitter gourd and set aside.
Repeat steps 8 and 9 until all the bitter gourds have been prepared.
Pour about half a cup of oil (rapeseed or mustard) to the frying pan to a depth of approximately half a centimetre and heat on medium heat.
Lower the bitter gourds into the oil and fry gently on medium heat until lightly golden in colour, turning occasionally to ensure all sides have been fried and cooked. TIP: take care as will splutter so best to fry on the back burner or bake in the oven - see below)
Remove and drain on kitchen paper. Remove the cotton thread/twine.
Alternatively, brush the stuffed karelas liberally with a vegetable oil and place in an oven heated to 180°C/350°F/Gas Mark 6 for 45 - 60 checking theme and turning them over occasionally until soft when pierced with a skewer and browned..
Serve with roti/paranthas and a dal
Spicy Whole Baby Aubergines/Baby Potatoes
Serves 4 as a side dish
Prep: 15 minutes Total: 45 - 50 minutes
Vegetarian, vegan and those on a gluten-free diet
Serve with any dal dish, flatbread and rice
Ingredients:
12 baby aubergines
16 baby new potatoes
oil for deep frying
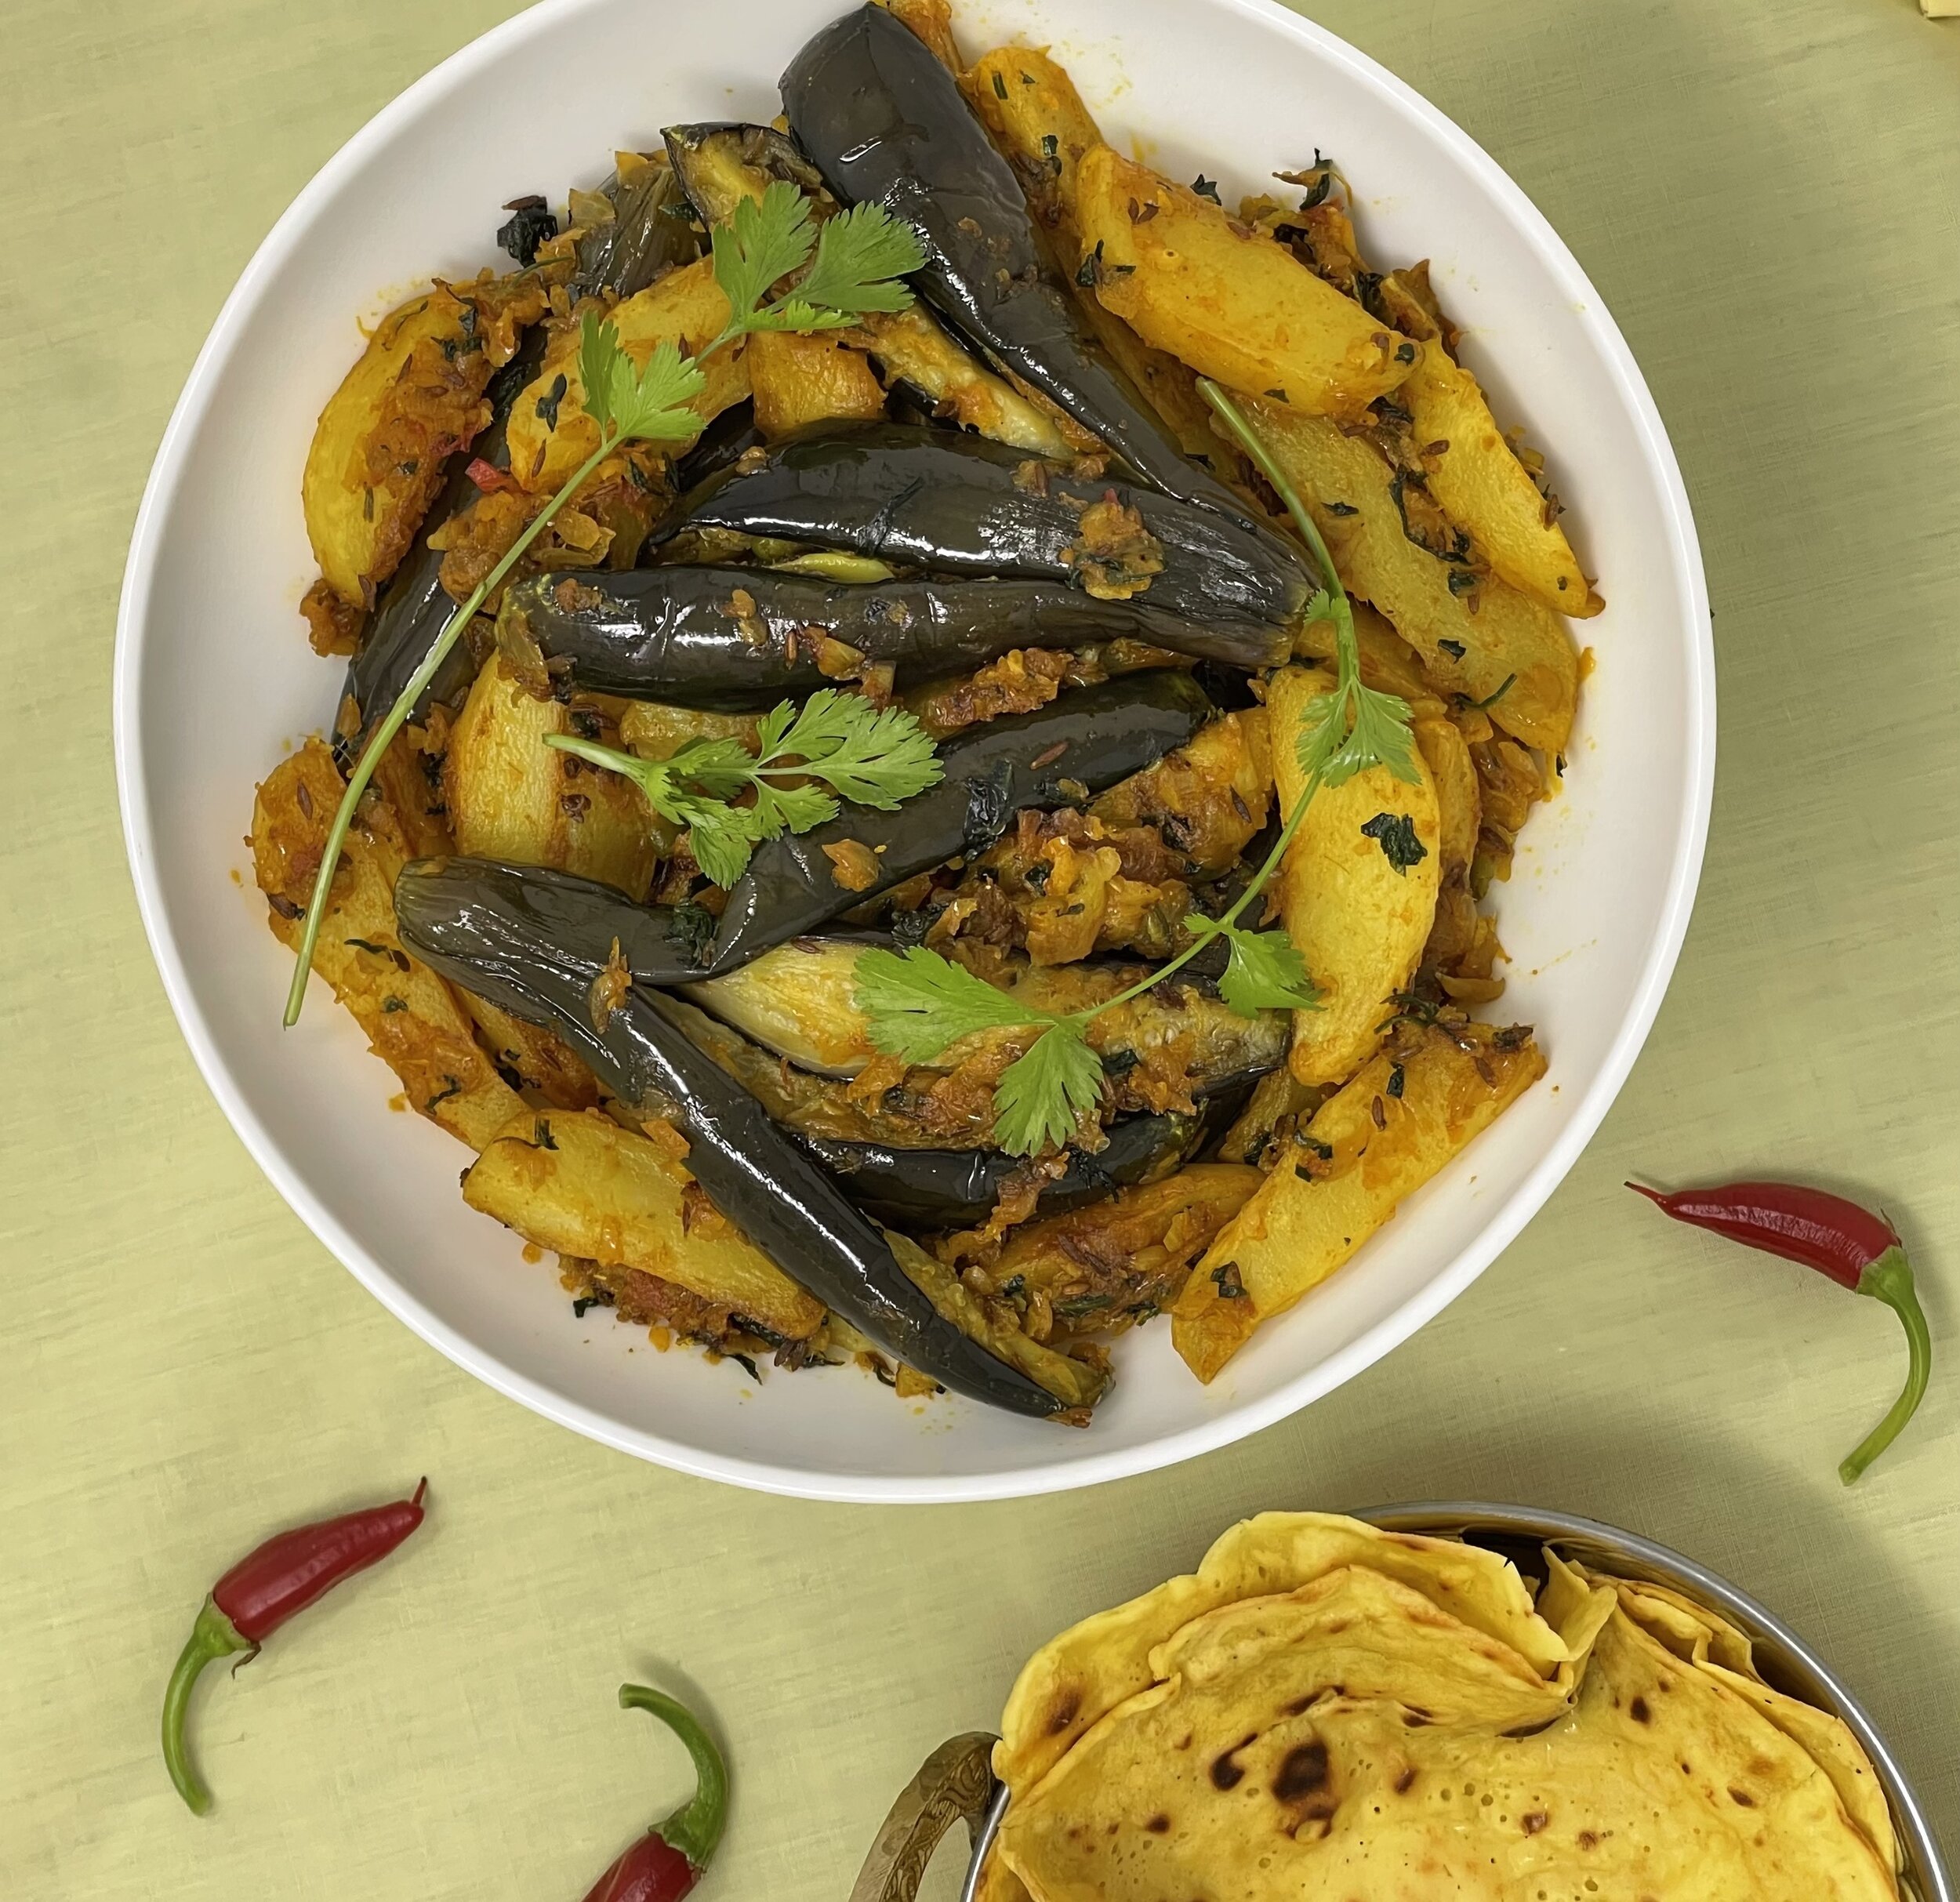
Spicy Baby Aubergines/Baby Potatoes served here with Gram Flour ‘Rotis’
Masala:
2 tablespoons vegetable oil
1 teaspoon cumin
1 medium onion, coarsely grated or chopped very finely
3 tablespoons chopped tomatoes, tinned or fresh
2 cloves garlic, crushed
1½ green chilli, deseeded and chopped
2 teaspoons salt
½ teaspoon turmeric
¼ teaspoon garam masala
handful of chopped coriander leaves
Method:
Remove the stalk of the aubergines, wash and pat dry with a clean tea towel.
Keeping each aubergine intact, slice lengthways in a cross from top of aubergine to about 1.5 cm from the bottom (stalk end). Set aside.
Peel the potatoes, keeping them whole wash and pat dry.
As with the aubergines, slice lengthways in a cross formation to about 1 cm from the bottom. Set aside.
Pour oil for deep frying in a wok up to a third way up from the bottom and heat on medium to hot heat.
Test the oil is hot enough by dropping a small amount of aubergine flesh in it. If it rises immediately, the oil is hot enough.
Gently place the aubergines in the hot oil on medium to high heat. Once they rise up, fry then for 5 minutes turning them over half way through.
Drain on kitchen paper.
Gently place the whole potatoes in the oil. Turn down the heat a touch and fry the potatoes for about 8 until light golden in colour. Drain on kitchen paper.
Whilst the vegetables are frying, make the masala. Heat the oil (butter or ghee) on medium heat until fairly hot (be careful with butter/ghee as these have lower smoking points). Add the cumin seeds and cloves and stir until they splutter (virtually immediately)
Turn the heat down to low/medium, add the onions and fry gently stirring occasionally until they soften.
Add the tomatoes, salt, turmeric, chillies, garlic, ginger stir. Continue to cook gently, ‘mashing’ the tomatoes until a paste like consistency forms. I use a potato masher.
Add the garam masala, stir and cook for a further minute or so or until the paste separates when a wooden spoon is dragged along the base of the pan.
Add a handful of chopped coriander, mix it through the paste and cook for a minute or two.
Place the fried vegetables into the masala, mix gently with two spatulas as when mixing a salad.
Place the lid on the pan, turn down the heat to a low/medium setting and allow to the steam to combine the masala and the vegetables for a couple of minutes.
Turn off heat and enjoy.
Saag Aloo/Paneer/Tofu
Serves 4
Prep: 10 mins. Cooking: 40 - 50 mins (the paneer and tofu can be fried whilst the spinach and tarka are cooking) plus paneer making time if not made ahead of time or using shop bought paneer.
Traditional saag is made with fresh spinach, mustard and fenugreek leaves but if these are not available then by all means use frozen spinach, making sure it is the tender baby spinach variety. For those wishing to make traditional North Indian saag I have listed the ingredients below in italics.
Vegetarian, vegan and those on a gluten-free diet
Serve with chapatis or paranthas, rice and a dal if needed

Saag Aloo made with fresh greens (first crop) from the garden…
Ingredients:
1kg frozen whole leaf spinach (preferably baby spinach) plus 300g frozen broccoli heads, defrosted OR (fresh greens made up of 400g spinach leaves, 400g mustard leaves and leaves from one large bunch of fenugreek, washed and chopped)
100ml water, (250ml water)
30g chickpea flour, sifted
250g paneer, preferably home made or tofu. (Can be made ahead of time, fried lightly and frozen until needed) OR 300g of waxy potatoes cubed (small cubes about 1cm in size parboiled for 5 minutes)
Tarka ingredients:
50g ghee/butter/Vegan Block butter (I use Naturli Vegan Block Butter)
2 teaspoons cumin
1 small onion
1 medium/large plum tomato, skinned and chopped or 3 tablespoons of canned chopped tomatoes
2 cloves of garlic
1½ - 2 green chillies
2 teaspoons salt
½ teaspoon turmeric
¼ teaspoon garam masala
Method:
Place the defrosted spinach (including the water from the defrosted spinach) or fresh greens and the corresponding amount of water into a pressure cooker. Add an additional 100ml of water.
Pressure cook for 10 minutes from when the pressure is achieved in the pressure cooker. After the 10 minutes are up, turn off the heat and allow to cool. Ensure no pressure remains in the pressure cooker before taking off the lid.
In a separate pan parboil the cubed potatoes (for saag aloo) for about five minutes.
Whilst the spinach is cooking, in a separate pan, make the tarka. Heat the butter or ghee on medium heat until fairly hot (be careful with butter/ghee as these have lower smoking points). Add the cumin seeds and cloves and stir until they splutter (virtually immediately)
Turn the heat down to low/medium, add the onions and fry gently stirring occasionally until they soften.
Add the tomatoes, salt, turmeric, chillies, garlic, ginger stir. Continue to cook gently, ‘mashing’ the tomatoes until a paste like consistency forms. I use a potato masher.
Add the garam masala, stir and cook for a further minute or so or until oil oozes out of the paste when a wooden spoon is dragged along the base of the pan
Cube and either shallow or deep fry the paneer or tofu (for saag paneer or saag tofu) until lightly golden in colour. Drain on kitchen paper and set aside.
Once the spinach has cooled down, add the sifted chickpea flour, stir gently and then blitz with a hand held blender for a couple of minutes until the spinach is smooth.
Add the spinach/chickpea flour mixture to the tarka, stir to combine. Cook with the lid on for a couple of minutes.
Add the fried paneer or potatoes, stir and combine with the spinach.
Simmer gently with the lid on for 20 - 30 minutes or so stirring occasionally. If it starts to stick to the bottom of the pan towards the end of the cooking time, turn down the heat, remove the lid and stir more often until all the liquid has evaporated.
The saag paneer/tofu/aloo is ready when a wooden spoon is dragged through the mixture leaves an almost clear channel. Droplets of ghee may also be visible.
Serve hot. Finger licking delicious!
Chickpea Flour ‘Rotis’
A great vegan, gluten-free alternative to traditional rotis made with chickpea (gram) flour. Versatile, why not use as a ‘wrap’/sandwich with your favourite fillings!
Makes 6 roti’s approximately 16cm in diameter
Prep: 5 minutes. Cook: 15/20 minutes
Vegetarian, vegan and those on a gluten-free diet.
Serve with any curry dish.

Chickpea flour roti’s
Ingredients:
100g Chickpea flour, sifted
130ml cold water
¼ salt
¼ paprika
¼ turmeric
¼ garam masala
rapeseed oil
Method:
Add the spices to the sifted flour and mix through.
Slowly add the water and whisk gently until the batter is of a thick pouring consistency (makes 200ml batter) and set aside.
Heat a tawa or frying pan (I used a 16cm diameter non-stick frying pan) on medium to high heat.
Spread ½ to 1 teaspoon of oil along the bottom of the pan.
Using a ladle gently pour c. 35ml of the batter in the centre of the and spread out the batter using a silicon/plastic flat spatula until a thin circular ‘roti’ is formed. Allow the underside to cook.
Once the edges of the pancake start to lift, turn the ‘roti’ over to cook the other side again.
Continue turning over the ‘roti’ over until both sides are cooked and crisp.
Remove from the heat and place on a warm plate.
Remove the pan from the heat for a minute or so to cool it a little otherwise the batter for the next "‘roti’ will cook before you have time to spread it out thinly.
Repeat steps 4 - 9 until all the batter has been used.
Serve with any of your favourite curries.
Vegan Date & Nut Loaf
Makes 1 loaf
Prep: 20 - 30 minutes. Bake: 60 - 65 minutes plus cooling time
Vegetarians, vegans and those on an egg and gluten free diet.
Not a recipe from my Indian heritage but a lovely gluten free, vegan loaf to serve, lightly toasted with soup or at breakfast

Date and Nut Loaf
Ingredients:
120g soft pitted Medjool dates
100g pecan nuts or walnuts
‘Wet Ingredients’
300ml almond milk
3 tablespoons of aquafaba (liquid from a can of chickpeas used as an egg substitute)
2 teaspoons of cider vinegar
½ teaspoon of sea salt
2 teaspoons of maple syrup
‘Dry Ingredients’
60g buckwheat flour
55g brown rice flour
30g teff flour
30g ground arrowroot or cornflour
55g ground flaxseed
1 teaspoon ground cinnamon
¾ teaspoon bicarbonate of soda
2 teaspoon baking powder
vegetable oil for greasing (I use rapeseed oil)
Method:
Preheat the oven to 180 - 200°C/400°F/Gas Mark 6
keeping a few nuts aside, roast the remaining nuts in the oven for about 5 minutes or until lightly browned. Remove, cool and then chop roughly
Grease and line a 1lb/450g loaf tin with greaseproof or baking parchment.
Place all the ‘dry ingredients’ (sifted flours, ground flaxseed, raising agents, cinnamon and the roughly chopped nuts) in a large bowl. Mix the contents to blend.
Pour the almond milk in a jug and warm in a microwave for 90 seconds. Pour into a blender.
Roughly chop the dates (removing stones if pitted dates are not available) if they are not soft otherwise leave them whole. Add the dates and the cider vinegar. Blitz the blender for about 20 seconds.
To the blender, add the aquafaba, salt and 1 teaspoon of maple syrup. Blitz again for a further 20 seconds.
Add the blended liquid ingredients to the dry ingredients in the bowl and mix with a metal spoon or spatula gently (in a figure of 8) until all the ingredients combine and the mixture thickens (a couple of minutes).
Pour the mixture in the greased and lined loaf tin and allow it to rest for about 15 minutes. Coat the reserved nuts with the remaining maple syrup and place on top. Turn the oven back on at the temperature listed above to reheat during the resting period.
Bake the loaf for c. 60 minutes until browned and baked through (check by passing a skewer through the centre of the loaf and it will come out clean if baked).
Remove from the oven. As soon as the loaf tin is cool enough to handle remove the loaf from the tin and cool on a wire rack.
Slice and serve. (I lightly toast and serve this bread with soup or have a buttered slice with a cup of chai). If freezes well in an airtight container lined with parchment paper.
Mutter Tofu (Vegan version of Mutter Paneer)
Mutter Tofu - a vegan version of Mutter Paneer
Serves: 4 Preparation time: 10 minutes. Cooking time: 45 minute.
Suitable for: Vegetarians, vegans and those on a gluten free diet.
Serve with rotis or paranthas and plain boiled brown rice

Mutter Tofu
Ingredients:
Tarka
3 tablespoons of vegetable oil or ghee
1 teaspoon of cumin seeds
4 cloves
1 medium sized onion, chopped finely
200g tinned tomatoes or 3 medium tomatoes - skinned and chopped roughly
1½ - 2 green chillies, chopped finely
2 garlic cloves, peeled and crushed
2 level teaspoons of salt
½ - ¾ level teaspoon of turmeric (use the higher amount if using fresh tomatoes)
½ level teaspoon of garam masala
1 inch fresh ginger, peeled and grated finely
Mutter Tofu
380g of shelled fresh peas, rinsed and drained (fresh peas give a ‘bite’ to this dish but frozen peas can be used in the absence of fresh. Frozen peas also give a sweeter flavour)
600ml water, approximately
320g of cubed tofu, lightly fried either shallow or deep fried. I used Cauldrons Organic Tofu.
Handful of chopped coriander.
Method:
Heat the oil (butter or ghee) on medium heat until fairly hot (be careful with butter/ghee as these have lower smoking points). Add the cumin seeds and cloves and stir until they splutter (virtually immediately)
Turn the heat down to low/medium, add the onions and fry gently stirring occasionally until they soften.
Add the tomatoes, salt, turmeric, chillies, garlic, ginger stir. Continue to cook gently, ‘mashing’ the tomatoes until a paste like consistency forms. I use a potato masher.
Add the garam masala, stir and cook for a further minute or so or until oil oozes out of the paste when a wooden spoon is dragged along the base of the pan
Add the peas to the tarka and stir to combine. Place the lid on the pan and cook gently for about 5 - 10 minutes stirring occasionally.
Add 600ml water. Bring to the boil. Turn down the heat to low/medium, add the tofu and bring back to simmering point. Place the lid on the pan and simmer gently for 20 minutes stirring occasionally.
Add the chopped coriander. Bring back to the boil on gentle heat, simmer for a minute or so.
Take off the heat. Serve piping hot garnished with fresh coriander leaves.
Mooli (Long White Radish) Paranthas
Makes: 6 Paranthas
Preparation time: 20 minutes. Dough resting time: 10 minutes
Rolling out/cooking time: approx. 25 minutes
Suitable for: Vegetarians and vegans (use a vegetable oil to brush each side of parantha).
Serve piping hot with any curry, a pickle or chutney and yoghurt.

Mooli Paranthas

Raw ingredients with cooked filling on the right
Ingredients:
For the filling:
1 tablespoon oil
1 teaspoon of cumin seeds
3 spring onions, finely chopped (the white and tender green parts)
1 large white mooli, grated coarsely (readily available from an Asian grocers)
1 clove garlic, crushed or finely grated
½ green chilli, finely chopped
¾ - 1 teaspoon salt
¼ teaspoon turmeric
¼ teaspoon garam masala
For the dough:
200g chapati flour (I use white or medium chapati flour)
1 tablespoon of plant based milk (dairy for non-vegans)
100g of cooked mooli filling
70 - 80ml water
Extra chapati flour for dusting and rolling out
Oil to brush each side of the parantha (ghee can be used by non-vegans)
Method:
Making the filling:
Heat the oil in a frying pan. Add the cumin and allow it to sizzle.
Add the chopped spring onions and fry on medium heat until soft, about five minutes
Add the crushed garlic and chilli, stir and cook for a minute or so.
Add the salt, turmeric and garam masala, stir to incorporate into the fried onions. Cook for a further minute or so.
Add the grated mooli, stir and cook on medium heat until it’s soft and cooked, stirring occasionally, about 10 - 15 minutes.
Take off the heat and set aside to cool.
Making the parantha dough and paranthas:
Place the flour in a bowl, add the milk and combine.
Add the mooli filling, mix the contents together until a crumb like consistency forms
Pour in the water a small amount at a time, mix/knead to form a pliable dough.
Knead for a few minutes until the dough feels smooth, dipping your fingers in the water to add small amounts of additional water if needed.
Cover the bowl with cling film and allow the dough to rest for 10 minutes or so.
Place the tawa or frying pan on the hob and heat on a medium to hot setting
Knead the dough once again for a couple of minutes then divide into six portions. If the dough feels too soft at this stage, roll it in thin dusting of dry chapati flour.
Starting with one portion, knead this again using your hands to form a ball and then flatten slightly with your fingertips.
Dust each side and roll out into a circular parantha approximately 6 inches in diameter using additional flour to dust where needed
Place the parantha on the hot tawa and allow it to cook partially on one side for a couple of minutes. Turn the parantha over and allow this (raw) side to cook for a few minutes checking a couple of times and pressing lightly around the edges if needed to ensure this side is fully cooked.
Turn the parantha back over once this side is fully cooked and coat the cooked side of the parantha with some ghee (c. ¼ teaspoon). Turn the parantha over once again and repeat the ghee coating process on this other side. Turn over once more and gently cook for a further 30 seconds or so. The parantha should be crisp on both sides yet soft in the middle
Remove from the tawa and place the parantha in a clean tea towel folded over on a warm plate.
Repeat steps 8 to 12 until all paranthas have been made.
Serve hot
Gluten Free Mooli (Long White Radish) Paranthas
Makes: 6 Paranthas
Preparation time: 20 minutes. Dough resting time: 10 minutes
Rolling out/cooking time: approx. 25 minutes
Suitable for: Vegetarians, Vegans (use a vegetable oil to brush each side of parantha) and those on a gluten free diet.
Serve piping hot with any curry, a pickle or chutney and yoghurt


Raw Ingredients and cooked mooli filling
Ingredients:
For the filling:
1 tablespoon oil
1 teaspoon of cumin seeds
3 spring onions, finely chopped (the white parts and the tender green parts)
1 large white mooli, grated coarsely (readily available from an Asian grocers)
1 clove garlic, crushed or finely grated
½ green chilli, finely chopped
¾ - 1 teaspoon salt
¼ teaspoon turmeric
¼ teaspoon garam masala
For the dough:
200g gluten free chapati flour (I use Eurostar Food Gluten Free flour)
1 tablespoon of plant based milk (dairy for non-vegans)
100g of cooked mooli filling
80 - 90ml water
Extra gluten free chapati flour for dusting and rolling out
Oil to brush each side of the parantha (ghee can be used by non-vegans)
Method:
Make the filling:
Heat the oil in a frying pan. Add the cumin and allow it to sizzle.
Add the chopped spring onions and fry on medium heat until soft, about five minutes
Add the crushed garlic and chilli, stir and cook for a minute or so.
Add the salt, turmeric and garam masala, stir to incorporate into the fried onions. Cook for a further minute or so.
Add the grated mooli, stir and cook on medium heat until it’s soft and cooked, stirring occasionally, about 10 - 15 minutes.
Take off the heat and set aside to cool.
Making the parantha dough and paranthas:
Place the flour in a bowl, add the milk and combine.
Add the mooli filling, mix the contents together until a crumb like consistency forms
Pour in the water a small amount at a time, mix/knead to form a pliable dough.
Knead for a few minutes until the dough feels smooth, dipping your fingers in the water to add small amounts of additional water if needed.
Cover the bowl with cling film and allow the dough to rest for 10 minutes or so.
Place the tawa or frying pan on the hob and heat on a medium to hot setting
Knead the dough once again for a couple of minutes then divide into six portions. If the dough feels too soft at this stage, roll it in thin dusting of dry chapati flour.
Starting with one portion, knead this again using your hands to form a ball and then flatten slightly with your fingertips.
Dust each side and roll out into a circular parantha approximately 6 inches in diameter using additional flour to dust where needed
Place the parantha on the hot tawa and allow it to cook partially on one side for a couple of minutes. Turn the parantha over and allow this (raw) side to cook for a few minutes checking a couple of times and pressing lightly around the edges if needed to ensure this side is fully cooked.
Turn the parantha back over once this side is fully cooked and coat the cooked side of the parantha with some ghee (c. ¼ teaspoon). Turn the parantha over once again and repeat the ghee coating process on this other side. Turn over once more and gently cook for a further 30 seconds or so. The parantha should be crisp on both sides yet soft in the middle
Remove from the tawa and place the parantha in a clean tea towel folded over on a warm plate.
Repeat steps 8 to 12 until all paranthas have been made.
Serve hot
Kala Chana (Black Chickpeas)
Serves: 4
Preparation time: 10 minutes. Cooking time: 45 minute. Soaking time: kala chana, overnight (minimum 8 hours)
Suitable for: Vegetarian, vegan (use vegetable oil instead of ghee/butter) and those on a gluten free diet
Serve piping hot with any of the Indian breads and plain boiled brown rice

Ingredients:
Tarka
3 tablespoons vegetable oil or ghee/butter
1 tablespoon cumin seeds
6 whole clove
1 medium onion, chopped finely
200g tinned plum peeled chopped tomatoes or 4 fresh tomatoes skinned and chopped
1½ - 2 chillies (green finger), chopped finely
2 level teaspoons salt
½ - ¾ teaspoon haldi (turmeric) - add the higher amount if using fresh tomatoes.
½ teaspoon of garam masala
2 cloves of garlic, crushed
1 inch piece of fresh ginger, peeled and grated finely
Kala Chana
230g of dried kala chana, rinsed and soaked in water overnight.
600 - 650ml water
handful of chopped fresh coriander
Method:
Preparation of dried kala chana:
Sort the kala chana to remove chaff/debris, rinse and soak overnight.
The next day, drain the soaked chana and rinse several times. Pour 600ml of water to a pressure cooker, add the chana and pressure cook for 20 minutes. Cool before opening the pressure cooker.
Whilst the chana are being pressure cooked, make the tarka in a separate pan.
Heat the oil (butter or ghee) on medium heat until fairly hot (be careful with butter/ghee as these have lower smoking points). Add the cumin seeds and cloves and stir until they splutter (virtually immediately)
Turn the heat down to low/medium, add the onions and fry gently stirring occasionally until they soften.
Add the tomatoes, salt, turmeric, chillies, garlic, ginger stir. Continue to cook gently, ‘mashing’ the tomatoes until a paste like consistency forms. I use a potato masher.
Add the garam masala, stir and cook for a further minute or so or until oil oozes out of the paste when a wooden spoon is dragged along the base of the pan
Add the tarka to the pressure cooked chana, stir and bring back to the boil.
Turn down the heat to low/medium and cover the pan with a lid. Simmer gently for 20 minutes stirring occasionally.
Add chopped coriander. Bring back to the boil once again, then turning the heat down simmer for a minute or so.
Serve piping hot .
Methi (Fenugreek) Paranthas
Makes: 6 Paranthas
Preparation time: 20 minutes. Dough resting time: 10 minutes
Rolling out/cooking time: approx. 25 minutes
Suitable for: Vegetarians and vegans (use a vegetable oil to brush each side of parantha)
Serve piping hot with any curry.

Raw Ingredients and final Methi Filling
Ingredients:
For the filling:
1 tablespoon oil
1 teaspoon of cumin seeds
3 spring onions, finely chopped
100g methi (fenugreek) leaves from 1 bunch of fenugreek from an Asian grocers, washed and chopped
1 clove garlic, crushed or finely grated
½ green chilli, finely chopped
¾ teaspoon salt
¼ teaspoon turmeric
¼ teaspoon garam masala
For the dough:
200g chapati flour (I use white or medium chapati flour)
1 tablespoon of plant based milk (dairy for non-vegans)
70 - 80ml water
Extra chapati flour for dusting and rolling out
Oil to brush each side of the parantha (ghee can be used by non-vegans)
Method:
Make the filling:
Heat the oil in a frying pan. Add the cumin and allow it to sizzle.
Add the chopped spring onions and fry on medium heat until soft, about five minutes
Add the crushed garlic and chilli, stir and cook for a minute or so.
Add the salt, turmeric and garam masala, stir to incorporate into the fried onions. Cook for a further minute or so.
Add the chopped methi, stir and cook on medium heat until wilted and cooked, about 5 minutes.
Take off the heat and set aside to cool.
Make the parantha dough:
Place the flour in a bowl, add the milk and combine.
Add the methi filling, mix the contents together until a crumb like consistency forms
Pour in the water a small amount at a time, mix/knead to form a pliable dough.
Knead for a few minutes until the dough feels smooth, dipping your fingers in the water to add additional water if needed.
Cover the bowl with cling film and allow the dough to rest for 10 minutes or so.
Place the tawa or frying pan on the hob and heat on a medium to hot setting
Knead the dough once again for a couple of minutes then divide into six portions. If the dough feels too soft at this stage, roll it in thin dusting of dry chapati flour.
Starting with one portion, knead this again using your hands to form a ball and then flatten slightly with your fingertips.
Dust each side and roll out into a circular parantha approximately 6 inches in diameter using additional flour to dust where needed
Place the parantha on the hot tawa and allow it to cook partially on one side for a couple of minutes. Turn the parantha over and allow this (raw) side to cook for a few minutes checking a couple of times and pressing lightly around the edges if needed to ensure this side is fully cooked.
Turn the parantha back over once this side is fully cooked and coat the cooked side of the parantha with some ghee (c. ¼ teaspoon). Turn the parantha over once again and repeat the ghee coating process on this other side. Turn over once more and gently cook for a further 30 seconds or so. The parantha should be crisp on both sides yet soft in the middle
Remove from the tawa and place the parantha in a clean tea towel folded over on a warm plate.
Repeat steps 8 to 12 until all paranthas have been made.
Serve hot
Gluten Free Methi (Fenugreek) Paranthas
Makes: 6 Paranthas
Preparation time: 20 minutes. Dough resting time: 10 minutes
Rolling out/cooking time: approx. 25 minutes
Suitable for: Vegetarians, Vegans (use a vegetable oil to brush each side of parantha) and those on a gluten free diet
Serve piping hot with any curry.

Methi Parantha
Thin, crispy and flavoursome…

Raw Ingredients and final Methi Filling
From left to right: chilli, salt, turmeric, garlic, garam masala with the photo of the filling to complete.
Ingredients:
For the filling:
1 tablespoon oil
1 teaspoon of cumin seeds
3 spring onions, finely chopped
100g methi (fenugreek) leaves from 1 bunch of fenugreek from an Asian grocers, washed and chopped
1 clove garlic, crushed or finely grated
½ green chilli, finely chopped
¾ teaspoon salt
¼ teaspoon turmeric
¼ teaspoon garam masala
For the dough:
200g gluten free chapati flour (I use Eurostar Food Gluten Free flour)
1 tablespoon of plant based milk (dairy for non-vegans)
70 - 80ml water
Extra gluten free chapati flour for dusting and rolling out
Oil to brush each side of the parantha (ghee can be used by non-vegans)
Method:
Make the filling:
Heat the oil in a frying pan. Add the cumin and allow it to sizzle.
Add the chopped spring onions and fry on medium heat until soft, about five minutes
Add the crushed garlic and chilli, stir and cook for a minute or so.
Add the salt, turmeric and garam masala, stir to incorporate into the fried onions. Cook for a further minute or so.
Add the chopped methi, stir and cook on medium heat until wilted and cooked, about 5 minutes.
Take off the heat and set aside to cool.
Make the parantha dough:
Place the flour in a bowl, add the milk and combine.
Add the methi filling, mix the contents together until a crumb like consistency forms
Pour in the water a small amount at a time, mix/knead to form a pliable dough.
Knead for a few minutes until the dough feels smooth, dipping your fingers in the water to add additional water if needed.
Cover the bowl with cling film and allow the dough to rest for 10 minutes or so.
Place the tawa or frying pan on the hob and heat on a medium to hot setting
Knead the dough once again for a couple of minutes then divide into six portions. If the dough feels too soft at this stage, roll it in thin dusting of dry chapati flour.
Starting with one portion, knead this again using your hands to form a ball and then flatten slightly with your fingertips.
Dust each side and roll out into a circular parantha approximately 6 inches in diameter using additional flour to dust where needed
Place the parantha on the hot tawa and allow it to cook partially on one side for a couple of minutes. Turn the parantha over and allow this (raw) side to cook for a few minutes checking a couple of times and pressing lightly around the edges if needed to ensure this side is fully cooked.
Turn the parantha back over once this side is fully cooked and coat the cooked side of the parantha with some ghee (c. ¼ teaspoon). Turn the parantha over once again and repeat the ghee coating process on this other side. Turn over once more and gently cook for a further 30 seconds or so. The parantha should be crisp on both sides yet soft in the middle
Remove from the tawa and place the parantha in a clean tea towel folded over on a warm plate.
Repeat steps 8 to 12 until all paranthas have been made.
Serve hot
Kaju (Cashew Nut) Barfi
Makes: 14 pieces
Suitable for: Vegetarians, Vegans and those on a gluten free diet
Preparation time: 15 minutes Making barfi time: 30 minutes
Total time: 45 minutes
A popular barfi for any occasion in particular Diwali, the Festival of Lights. It’s quick and easy to make too.

Kaju Barfi
Ingredients:
200g cashew nuts, halved
125g - 150g granulated white sugar
100ml water
½ teaspoon of crushed cardamoms or 1 teaspoon of rose water, optional
few strands of saffron, optional
Method:
Infuse the flavour of the cardamoms by placing them in 100ml of warm water. Keep on the hob with the heat on its very lowest setting (about 15 minutes). Skip this step if using rosewater.
In the meantime, using a coffee grinder, grind the cashew nuts using an intermittent pulse motion for a few seconds rather than a continuous setting to prevent the cashews becoming sticky due the ‘oil’ being released from over grinding to give a fine texture. I ground mine in three batches.
Sieve the resulting ground cashew nuts through a metal sieve returning any coarse nuts remaining in the sieve to the grinder to regrind. Place aside.
Strain the cardamom infusion (or not if you prefer the taste of crushed cardamom ‘pieces’) retaining the liquid. (At this point there should be around 80 - 90ml of infused liquid. If not, add water to make it up to 80 - 90ml). Pour the infused water back into the pan and add the sugar.
Dissolve the sugar on medium heat turning. Add the rosewater is using instead of the cardamoms.
Turn the heat down to just simmering point and simmer gently for 5 minutes.
Add the ground cashew nuts in three batches stirring gently after each addition to ensure they combine without forming lumps.
Continue to stir over a low/medium heat for a further 15 minutes until mixture starts to leave the sides of the pan turning down the heat if it starts sticking.
Test the mixture to see if it is ready by taking out a small amount with a teaspoon. Allow it to cool and then roll between your fingers. If it forms a smooth round ball cleanly without sticking to your fingers, the mixture is ready.
Remove from the heat and transfer to a shallow bowl or plate and allow to cool.
Once cool enough to handle, sprinkle a few strands of saffron over the barfi mixture and knead it in the palm of one hand with the fingers of the other for a minute or so.
Roll out the mixture between two sheets of greaseproof paper into a rectangular shape about 1cm thick.
Allow the barfi to cool down completely and then cut the barfi into diamond shapes with a sharp knife.
Serve the barfi immediately.
This barfi can be stored in a airtight container for up to 5 days depending on the ambient temperature.
Gluten Free Roti Dough
Gluten free roti (Chapati) Dough
Makes one portion sufficient for 6 rotis or 6 paranthas
Preparation time: 5 minutes. Resting time: 15 minutes
Suitable for: Vegetarians Vegans (use a vegetable oil instead of ghee or butter in the recipe) and those on a gluten free diet.
Ingredients:
200g gluten free chapati flour (I use Eurostar Food Gluten Free flour)
1 tablespoon of plant based milk
40 - 60ml water (more if necessary)
Method:
Add the milk to the flour in a bowl and mix until combined
Pour a small amount of water to the flour at a time to form a pliable dough.
Knead for a few minutes until the dough feels smooth, dipping your fingers in the water to add additional water if needed.
Cover the bowl with cling film and allow it to rest for 15 minutes or so.
Use as required.